Bread in a Bag (Mini Loafs)
I love to find new recipes online that I can use on the boat, camping or even at home. I found this one when I was looking for "non-messy bread recipes" and have been wanting to try it out for a while now. It looked like fun to do and almost too good to be true!
This morning, I got to test it out, and get the answers to a few question:
1 - Can I bake it in the toaster over?
2 - How does it taste?
3 - How much of a mess will I have to clean? (on the boat, I don't want to have a big mess - ie: flour everywhere)
Here are my observations:
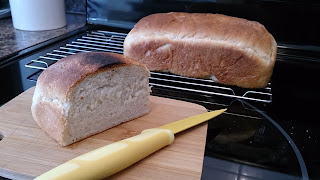
1 - Yes, you can bake it in the toaster oven, however mine burnt a bit.
2 - It tasted delicious!!! A new favorite has been found.
3 - Almost no mess - I scrapped off the dough (that stuck to the cutting board I used to knead) right into the garbage. Wiped up the flour next to it and threw out the large Ziploc bag I used.
I cooked one in the normal oven (the one that is still intact in the photo above) and the other in my toaster oven (see the bit of the top crust burnt?). I will have to watch what I cook in the toaster oven better next time.
On Sea Loons, my options for baking are to use a toaster oven or a BBQ. My desire to try out different recipes now and modify as needed are part of out preparation for the Great Loop.
Here is the recipe if you want to try it too (I reformatted it to print and add to my cookbook binder.)
Bread in a Bag-Mini Loaves
Serves: 2
loaves
Ingredients:
◦3 cups
unbleached white flour (separated)
◦4
Tablespoons sugar
◦2½
teaspoons rapid rise yeast
◦1 teaspoon
salt
◦3
Tablespoons oil
◦1 cup of
warm (but not hot) water
Instructions:
1. In gallon
size/large Ziploc bag add: 1 cup of the flour, sugar, yeast and warm water. Seal
up bag, let out as much air (out of the bag) as possible. Scrunch and
squeeze the ingredients around in the bag, till they are mixed well together.
2. Let the
bag set on the counter for 10 minutes, so the yeast can begin
to work.
3. Then open
the bag again, add: another cup of the flour, the oil and the salt. Close the
bag and repeat scrunching and mixing. Finally open the bag again, add the final
cup of the flour, mix one last time.
4. Lay out a
sheet of wax paper lightly dusted with flour, and pour the mixture onto it.
5. For
around 5 minutes (or less), knead and work the dough till it’s all nice and
smooth. Divide the dough into two portions, and place in mini loaf pans that
have been sprayed with cooking spray. (Mini loaf pan size is 5-1/2″ x 3″ x
2-1/2″ ).
6. Let rise
in a non drafty warm spot, cover them with a clean kitchen towel. Let them raise
for 30 minutes to an hour, till
they’ve almost doubled in size. If they don’t get a whole lot bigger, don’t
worry, they will raise some in the oven too.
7. Bake for around 25 minutes, in a
preheated 375 degree oven, or until bread sounds hollow when you tap it on the
top, and the top is a pretty lightly browned color.
8. Let them
cool in the pan for just a couple of minutes, and then turn them out onto a
cooling rack or clean towel.
Original recipe can be found at:


Comments
Post a Comment